Frequently Asked Questions
Can I include video in my narrative?
Yes! At present Genarrator can only support mp4, so if you have mov or other formats, please convert to mp4. If you use a non-standard mp4 you might find that playback is erratic, so please use standard mp4. It's easy to convert to mp4 - there are free sites that will do this for you, or you can convert in your Mac or Laptop (using iMovie for example).
The bigger the file size, the slower your video will load and play - you might experience buffering (freezing for running sow), so keep the video as low-resolution as you can.
How can I create Group Folder?
If you want to create a group folder for your work, all you need to do is email Genarrator's admin team: [email protected]
A group folder could be a place where all your own narratives are stored, or if you are a tutor, for example, maybe you want all your students' narratives in one place. Narratives collected in a  group folder will still be visible via the main home page, and will be listed under 'Recent' and 'Popular' tabs, but will also be in the group folder.
How can I import / amend images?
The best images to import are JPEGs because these can be used as small, low-on-memory files. This will be better for Genarrator as it will make your pages load quicker when users view your work.
You can also use PNG files, and these are useful if you want an image to have a transparent background so you can place it on top of another image, e.g. a figure on top of a landscape.
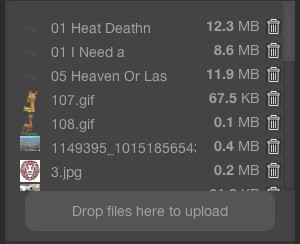
To import, opens the Files tab. Navigate around your computer or storage device until you find the image you want. Once you have selected the image, drag it into the 'Drop files here to upload' field - see image below. Genarrator uploads it to the Files menu and you can then simply drag the image from the list of your files into the page you are working on.
 Images can be re-shaped on the Genarrator stage (i.e. the page you are working on) by dragging the grab-handle on the bottom-right of the image.
You can also crop images within Genarrator: the crop tool sits on the top right of the image when it is placed on the page you are working on.
If the image is so physically large that it cannot fit onto the Genarrator screen, you will probably not be able to find the grab handle. You will have to go back into Photoshop (or whatever package you used to make the image) and resize it to a workable physical size and resolution.
Beware! If you delete an image from the Files menu it will disappear in all the pages where you have used it.
Images can be re-shaped on the Genarrator stage (i.e. the page you are working on) by dragging the grab-handle on the bottom-right of the image.
You can also crop images within Genarrator: the crop tool sits on the top right of the image when it is placed on the page you are working on.
If the image is so physically large that it cannot fit onto the Genarrator screen, you will probably not be able to find the grab handle. You will have to go back into Photoshop (or whatever package you used to make the image) and resize it to a workable physical size and resolution.
Beware! If you delete an image from the Files menu it will disappear in all the pages where you have used it.What are Display Rules and how do I use them?
This tool allows you to control what pages or items can be viewed and when. You can use this if you want to keep a page or item hidden until the viewer has seen certain other pages (e.g. to create tension or to hide the ending page until the whole narrative has been viewed).
Click the Display Rules button. When the dialogue box opens make sure you have clicked on the page or the item you want to ‘hide’. The dialogue box rubric will tell you what you have selected to hide. You will see the rubric change as you select text, images, or a whole page. You can also select any pages you wish to define as ‘you must see these pages before you can view this page’. So, if you are working on page 10 and viewers must see pages 8 and 9 before they can see 10, then you would select pages 8 and 9.
What does the Site Map button do?
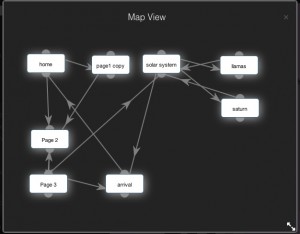 As your narrative is being built you will be linking to and from pages. You can easily confuse yourself with the linking structure if you don’t keep track of it. Click on the Site Map button to see a simple graphic view of every page in your narrative and every link you have created. You will see the direction of the link indicated by the arrow-head. You can move the windows in the site map to create preferable arrangements.
TIP: Readers will want every link to develop the narrative, so don’t insert links for fun! Each time a reader clicks on a hot spot they want to be taken to somewhere that meaningfully progresses the narrative.
As your narrative is being built you will be linking to and from pages. You can easily confuse yourself with the linking structure if you don’t keep track of it. Click on the Site Map button to see a simple graphic view of every page in your narrative and every link you have created. You will see the direction of the link indicated by the arrow-head. You can move the windows in the site map to create preferable arrangements.
TIP: Readers will want every link to develop the narrative, so don’t insert links for fun! Each time a reader clicks on a hot spot they want to be taken to somewhere that meaningfully progresses the narrative.Can I make changes to my bottom-bar menu?
As you are editing your narrative you will see that that the bottom menu creates thumbnails of every page in your narrative, allowing you to see your page designs easily. You can drag these thumbnails along the menu bar to re-order them. You can name these pages or simply keep them as numbered pages.
Duplicate pages can be made by simply clicking on the little copy symbol at the top-right of each thumbnail.
TIP: You can allow your viewers to see the bottom-bar menu by opening the Narrative Settings tab and then toggling 'Menu public' to 'on'. Some narratives may be easier to read and navigate by showing the menu, while some may work better (e.g. perhaps be more intriguing) with that menu hidden.
How do I crop images?
When you drag an image onto the stage (the page you are working on) a crop symbol appears at the top-right of the image box. By clicking on this, you can then resize the highlighted crop area around the image, creating the area you wish to save, and cropping the rest.  When you have positioned the crop area correctly, click the Update button at the bottom-right, and the image will adjust to the saved area, deleting the rest.
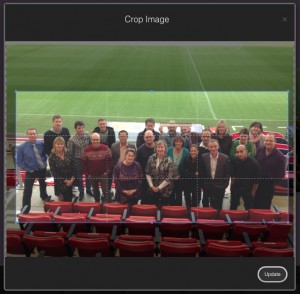 This action will not crop the original image which is saved in the Files list.
 This action will not crop the original image which is saved in the Files list.
How do I convert audio files?
If you want to use audio with Genarrator it must be in MP3 format.
If your files are in any other format then don’t worry; you can quickly convert them here without losing any quality!
How do I add background music?
You can have music or sounds playing continuously as a backdrop to a screen, a sequence of screens, or even the whole narrative. These soundtracks run while the screen is being viewed, and/or for as long as the soundtrack itself is. So, if the soundtrack is a minute long and the viewer takes more than a minute to read the screen(s), the soundtrack will stop.
Upload the sound file using Files tab, as for all media assets in your narrative.
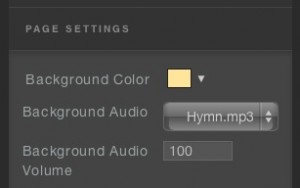 Open the Page Setting tab. Use the Background Audio drop down menu to select the track you wish to play while the screen you are editing is being viewed. You must select that track for each screen individually. Please note that the sound will run continuously across all consecutive screens you select it for - it will not restart each time the next screen is viewed. If the viewer comes to a screen where the sound hasn’t been selected, the soundtrack will stop.
If you want the soundtrack to run across all the screens in your narrative you must select it individually for each and every screen - please remember the sound will only run for as long as it can, e.g. 3 minutes.
Open the Page Setting tab. Use the Background Audio drop down menu to select the track you wish to play while the screen you are editing is being viewed. You must select that track for each screen individually. Please note that the sound will run continuously across all consecutive screens you select it for - it will not restart each time the next screen is viewed. If the viewer comes to a screen where the sound hasn’t been selected, the soundtrack will stop.
If you want the soundtrack to run across all the screens in your narrative you must select it individually for each and every screen - please remember the sound will only run for as long as it can, e.g. 3 minutes.How do I add sound effects?
1. You can upload a sound file via the Files tab (mp3 files are best). Select the sound file from your computer or storage device, and drag it to 'Drop Files here to upload'.
 2. Drag the sound clip onto the stage - the shape of the sound file can be adjusted as with images and text boxes and the shape you make is the active (clickable) area for that sound. The sound effect can be activated by a click, a rollover or as soon as the screen loads - this can be chosen via the Sound Options panel that will open up if you double click the sound file on the stage.
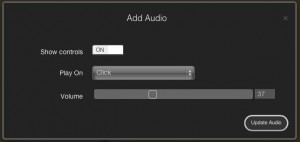 3. If you want the sound to activate if someone clicks on an image (e.g. clicks on a door bell to make a bell ring), you must place the sound file on top of the image - you can use the forward/backward tool for this.
4. You can choose to show sound play/pause controls on the final screen, to give the viewer control.
 2. Drag the sound clip onto the stage - the shape of the sound file can be adjusted as with images and text boxes and the shape you make is the active (clickable) area for that sound. The sound effect can be activated by a click, a rollover or as soon as the screen loads - this can be chosen via the Sound Options panel that will open up if you double click the sound file on the stage.
 3. If you want the sound to activate if someone clicks on an image (e.g. clicks on a door bell to make a bell ring), you must place the sound file on top of the image - you can use the forward/backward tool for this.
4. You can choose to show sound play/pause controls on the final screen, to give the viewer control.
3. If you want the sound to activate if someone clicks on an image (e.g. clicks on a door bell to make a bell ring), you must place the sound file on top of the image - you can use the forward/backward tool for this.
4. You can choose to show sound play/pause controls on the final screen, to give the viewer control.← Select your question
Back Up

